
 Tenía planeado desde hacía bastante tiempo publicar un artículo sobre la gestión de privacidad den Facebook, entre otras razones porque me lo pidieron y porque estoy seguro de que resultará útil a mucha gente que utiliza esta red social para relacionarse con los demás. ¿Entonces, cuál es el objetivo de este artículo? Pues no es otro que aprender a gestionar nuestra privacidad de una manera óptima asegurando que determinada información nuestra sólo esté visible a quienes nosotros queramos.
Although there are many ways to manage our privacy, I am going to comment on the one that I use and consider optimal for my needs and those of most people: assign different degrees of closeness to our contacts.
Where and how do I manage privacy on Facebook?
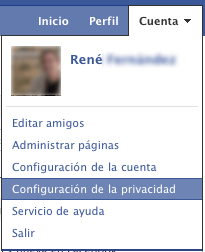 Algunas de las opciones de Facebook están un poco escondidas y este es uno de los casos. Para gestionar nuestra privacidad deberemos hacer clic arriba a la derecha donde pone “Cuenta” y posteriormente seleccionar “Configuración de la Privacidad”.
A screen will appear showing information about our current privacy settings, indicating what people can see. There are four degrees of privacy for each section, ranging from least restrictive to most restrictive:
- Everyone: All Facebook members will be able to see our information.
- Friends of friends: Only your friends and their friends will be able to see this information.
- Friends only: Only visible to your friends.
- Others: The one we are going to learn to use. It is customizable and we can manage the visibility of our information by organizing it into groups.
By default, Facebook’s privacy settings are too permissive and allow strangers to see too much personal information without most people knowing, so let’s fix that. (You can read more about it in this Blogoff post).
The solution: Organize our friends into lists
It may sound a bit sectarian, but it is really the only possible solution to the problem of privacy at a time when it may even seem wrong to reject someone who wants to be your friend on a social network.
The solution I propose below is the one I use, although obviously there may be others. It simply consists of creating “closeness lists” for which we will manage our privacy rules separately. Let’s go with an example:
- Proximity 1: In this group we will put family members.
- Closeness 2: Group for close friends (the kind where we only have 4 or 5)
- Closeness 3: For other friends with whom we do not have as much trust.
- Closeness 4: In this we will include acquaintances who add us but with whom we do not have any type of trust.
- Proximity 5: This group will be the one in which we will add all pages, contacts with zero trust, Facebook groups or Facebook accounts of companies that have added us and that we have not said no to avoid making a mess.
I guess you more or less understand where the shots are going. Depending on our needs, we can use more or less proximity lists.
Where are proximity lists created?
To create a list of friends on Facebook, we will go to “Account” (top right) and then choose “Edit Friends”. From here we can create lists, modify our friends’ lists and delete them.

We can assign a name to the list and then add all the friends we want to it. If we get confused, nothing happens because later we can manage it completely, adding and removing friends from them.
I already have my lists created, now what?
At the beginning of this article I briefly discussed Facebook’s privacy options and where to find them. Now we will have to go back there to customize them according to our interests by clicking on “Customize settings”.
Once done, we will see a screen with many customization options grouped into several sections: Things I share, Things others share and Contact Information. It may seem like a lot of things, but we will only need to customize those that we consider necessary and, in practice, it is a purely mechanical task.
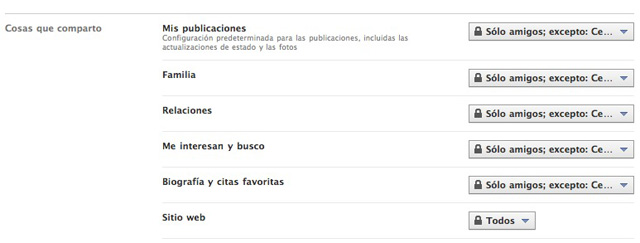
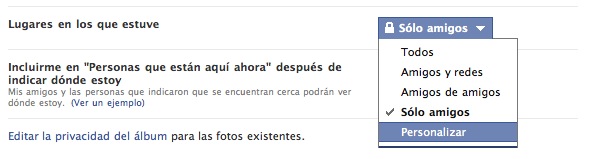
To modify the privacy of each section, we will click on the drop-down menu on the right and then select “Customize”, which will open a new window.
This new window will be where the groups of friends that we have previously created will come into play. In the first drop-down menu: “Make this content visible to the following people” we will select specific people and then we will begin to write the name of the groups that we have created.
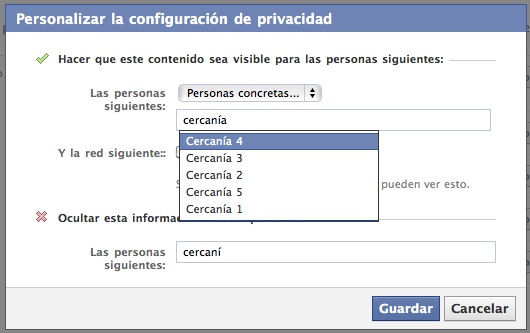
Once we have selected all the groups that we want to be able to see that information, we will click Save and from that moment on the information will only be available to the members of that group. There is also the option to fill out the second drop-down menu to choose the groups that we do not want to see our information.
Finally, we will only have to repeat the process for all the privacy sections and we will have Facebook under control, both for friends and strangers. If you have any questions you can use the comments.