
CSS Sprites is an HTML design technique that allows us to drastically reduce the number of requests when loading images on our website. As? Well, putting together as many of these as possible in the same image. Below I give you a small explanation of this technique, which can make your server less saturated and your pages load faster.
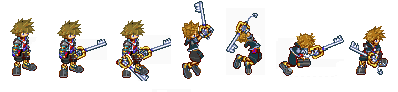
Surely many of you will be familiar with those images from old video games in which many of the characters’ movements appear in a row. The CSS Sprites technique follows the same basis as the animation of these games. As I said in the previous paragraph, it consists of combining several images into one to reduce the number of server requests and then choosing the part of the image that we want to use with the “background-position” property, which allows us to move around within a background image.
Nothing better than a simple example to learn how to use this technique, which is not complicated at all although it may seem that way at first.
Step 1: Put images together
First of all we will have to join all the images we want into one. To do this we can do it manually with our favorite image editing program or else with a web tool created for this purpose, called CSS Sprite Generator. In the latter, it will be enough for us to upload all the images and click on “generate” so that it returns the union of all of them and also the CSS code with the position of each one.

Step 2: Write the code
Now that we have our images joined and the position of each, we will have to start writing our CSS and HTML code so that everything is displayed correctly. At this point we must be clear about two concepts: the first, that we will need a generic container for the image, for example a link that affects the classes or ids of the images. And also the CSS and HTML elements that indicate the position of each image. Is it clear? Let’s look at an example:
Container
CSS code: [css] #container a{ background-thumbnail-img: url(‘images/imagenCSSSprite.png’) no-repeat; text-indent: -9999px; height: 16px; width:16px; display: block; float: left; padding-left: 5px; } [/css]
This will be the CSS code that will display our image in the links found within #container. So now we will just have to write the code so that each link shows a different part of the image. The “text-indent” and “display” properties are optional and I put them so that the links do not show any text, also, with “float” I am making sure that they are displayed on the same line.
Basic CSS Sprite Code
CSS code: [css] #container a.bocabit{background-position: 0px 0px; } #container a.lvb{background-position: -26px 0px;} #container a.eg{background-position: -43px 0px;} #container a.faseExtra{background-position: -68px 0px;} #container a.ert{background-position: -94px 0px;} [/css]
This code says that for the “bocabit” class, show the first part of the image, while for the “faseExtra” class, show from pixel 68 of the image, etc. (The background-position attributes are “X-axis” and “Y-axis” by default.
HTML code: [html]
[/html] In this code we have only included the links with their respective classes, so it should now be fully functional.You can see the result in the top bar of this blog where the icons of the rest of the [Bleef] blogs appear (https://bleef.net “Bleef”) or in the social icons below each article.

Is this useful for anything?
Yes. As I mentioned, it can greatly reduce the number of requests from our server and also increase the loading speed of our page. This is because since it is a single image that is loaded, it will only take time to connect once to download it, while if there are several, it will have to connect several times with the resulting loss of performance.